Creating a beautiful table doesn’t have to be complicated or expensive. I styled 2 large dinner tables for a rehearsal dinner and put together a DIY table centerpiece that felt elegant, effortless, and totally customizable for any type of event.

Whether you’re hosting a dinner party, bridal shower, or just want to elevate your next gathering, this centerpiece idea is one you can easily recreate.
In this post, I’m sharing all the details to help you create your own DIY table centerpiece. I’ll list out the materials I used, the styling process, and a behind-the-scenes look at how it all came together. Plus, I’ve included photos so you can see the process and final look.
How I Created This DIY Table Centerpiece
To create this simple yet elegant DIY table centerpiece, I started with a mix of affordable greenery and candlelight to build a layered, organic look. Here’s a breakdown of what I used and how it all came together…

Centerpiece Materials:
- Seeded Eucalyptus ($35)
- Poet’s Laurel
- Leatherleaf Fern ($20)
- White carnations ($5)
- White roses ($5)
- Glass votive holders
- Votive candles
- Glass floating candle holders
- Floating candles
The Greenery
Leatherleaf Fern
My local florist suggested leatherleaf fern when I described the look I wanted. Luckily fern is typically one of the least expensive options! I got a handful of bushels for this event because I knew I had 2 very long tables to work with. Leatherleaf fern lays flat and spans out wide giving a full effect. This is what I started with as my base. I laid these out and staggered them down the table organically, basically alternating their direction.
Poet’s Laurel
The poet’s laurel actually came from a neighbor’s yard. This was a great option for the look I wanted and the bonus was that it was free. Its longer lines and glossy leaves help the centerpiece feel full without looking heavy. Depending on the time of year you use this, you your stems could have green or beautiful orange/red berries. The berries typically start to turn color towards the fall. If you have a poet’s laurel shrub or a friendly neighbor willing to share, this works perfectly and stays green without water!!
Poet’s laurel isn’t usually something you can pick up from your local florist so if you want this look but can’t find poet’s laurel, go with Italian Ruscus – most florists carry this and it’s very popular in wedding arrangements.
Seeded Eucalyptus
This is where I splurged just a little. Eucalyptus was also something my local florist had on hand. I opted for seeded eucalyptus because I liked the look of the little seed pods!
The seeded eucalyptus was what I added in last, tucking the stems in wherever it felt natural. I bought 4 bushels from the florist and this easily helped fill in the centerpiece and tie everything together. To start, I laid all of the stems out and took a handful at a time and would walk down the table and stick one it at a time, spreading them throughout without any real pattern. If a stem was too much I’d separate it into 2 or 3 pieces to tuck into smaller holes.

The Florals
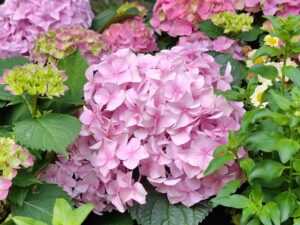
White carnations & White roses
For flowers, I ended up grabbing a simple bunch of carnations and roses from Walmart. I didn’t go for a lot here because I knew I just wanted to add a little pop of color. With this being a wedding rehearsal my mind was on white and how to incorporate white flowers. This added just a little feminine touch.
The Candles
Glass Votive Holders + Votive Candles
Once the greenery was set, I scattered small votive holders along the length of the table between the greenery. These add a warm, flickering glow that instantly makes the table feel more inviting and intimate.
Glass Floating Candle Holders + Floating Candles
For added height and dimension, I placed clear floating candle holders along the table. I borrowed these from another friendly neighbor but I can link some options for you. These were the best finishing touch because the candles reflect beautifully off the glass and water, adding a soft, romantic vibe to the entire setup.
Tips for an Easy DIY Centerpiece
-
Layer loosely: Don’t overthink placement. Let the greenery fall naturally and overlap a little.
-
Keep it low: I avoided tall florals or centerpieces so guests could see each other across the table.
-
Mix textures: The combo of eucalyptus, laurel, and fern gives dimension without needing a lot of flowers.
-
Don’t interfere: Think of where your guests will set their drink cups or utensils and avoid getting in their way.
Shop the Table Details
While the centerpiece was the star of the table, I also styled the place settings with a few key pieces that helped tie everything together. If you’re planning a similar event or dinner party, here are the other items I used:
-
Disposable linen-feel napkins – Soft, neutral-toned napkins that added a casual, layered look.
-
Woven Chargers – These added texture and warmth under each plate.
-
White Dinner Plates – A simple, clean design that works with any style.
-
Goblet Drinking Glasses – I have a large collection of goblet glasses for this very reason. If you need a quick online option I’ve linked one but here’s my tip: go to your local dollar store. I get all of my goblets, wine glasses, and plates from the Dollar Tree. My husband laughs when I spend $50 at the Dollar Tree but I have enough stuff for a party of 40. And if something breaks I don’t cringe, I just toss it and go get another.
-
Gingham Tablecloth – I get all of my polyester tablecloths from here. They’re typically priced low and I buy in bulk for events like this. They have tons of size options available. I used 6ft tables with the floor length tablecloth size 90″x132″.
-
Printed Menu Cards – I got a simple template from Etsy and then sent the edited version to my local print shop. They printed these for about $25.
This post was all about how I created this DIY table centerpiece for a rehearsal dinner. With the list of materials and tips shared, you can create your very own DIY centerpiece for a wedding or event.
Some of the links included are affiliate links, which means I may earn a small commission if you decide to shop through them (at no extra cost to you). Thanks for supporting my blog!